Synchronization of Model Elements
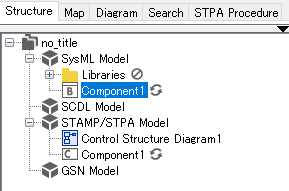
Synchronized Model Elements are marked with  icon in the Structure Tree

Synchronizable Model Elements
SysML Requirement and SCDL Requirement
Model Element |
Attribute |
Model Element |
Attribute |
SysML Requirement |
Name |
SCDL Requirement |
Name |
SysML Requirement |
ID |
SCDL Requirement |
ID |
SysML Requirement |
Text |
SCDL Requirement |
Definition |
SysML Block and SCDL Element
Interface Block and Constraint Block can also be synchronized with Element
Model Element |
Attribute |
Model Element |
Attribute |
SysML Block |
Name |
SCDL Element |
Name |
SysML Block and STAMP Component
Interface Block and Constraint Block can also be synchronized with Component
Model Element |
Attribute |
Model Element |
Attribute |
SysML Block |
Name |
STAMP Component |
Name |
SysML Requirement and GSN Goal
Model Element |
Attribute |
Model Element |
Attribute |
SysML Requirement |
Name |
GSN Goal |
Statement |
How to synchronize Model Elements
There are two ways to configure synchronization between Model Elements.
Configuring synchronization during Converting Model Element
When convert Model Element, you can also configure synchronization.
The drop-down list in the [Convert to Model] dialog shows only synchronization rules that can be applied to all of the selected rows in the table.
Check [Configure model synchronization] in the [Convert to Model] dialog.
- Click [OK].

For more information on converting Model Element, see Model Integration Related Functions - Converting the Model Element - How to Convert Model Element
Configuring synchronization from the Property View
The drop-down list in the [Synchronization] dialog shows only synchronization rules that can be configured with the selected Model Element.
Go to [Synchronization] tab in the Property View of the Model Element for which you want to configure synchronization (SysML Block).
Click [Add].
In the [Synchronization] dialog, select a STAMP Component from the tree for which you want to configure synchronization.
Click [OK].
- Attributes of the selected Model Element will be applied to the Model Element shown in the Property View.

In this example, Name of the Component will be applied to Name of the Block after synchronization configured.
Desynchronization
Go to [Synchronization] tab in the Property View of Model Element which you want to desynchronize (either Block or Component.)
In the [Synchronization] tab, select synchronizations to be removed, then click [Delete].

Notes on synchronization settings
It is not possible to synchronize Model Elements unless required attributes are properly set.
e.g., GSN Goal cannot be converted into synchronized SysML Requirement unless you set the Goal’s Statement
e.g., When configuring synchronization from the Property View of a SysML Requirement, you cannot choose a GSN Goal unless the Goal’s Statement is filled.
When a Model Element is deleted, all the related synchronizations will be removed.
Hoever, the synchronized models will not be deleted.
