
Build your SysML v2 model together with your AI agent. SysMLv2 Modeler is a Visual Studio Code (VS Code) extension for MBSE that lets you and your AI agent work on the same model, in text and on diagrams.
This guide uses the included sample, a small delivery robot, to walk you through the basics in three steps: exploring the model, connecting your AI agent, and editing with AI and by hand. The sample contains nine diagrams that cover all eight standard SysML v2 view kinds.
Contents
- 1. Installation
- 2. Exploring a model
- 3. Connecting your AI agent
- 4. Editing a model
- 5. Good to know
- Troubleshooting
- Contact, feedback, requests and bug reports
1. Installation
System requirements
Before installing, make sure your computer runs on one of the supported platforms.
Supported platforms Windows (x64), macOS (Apple Silicon), and Linux (x64). Windows on ARM64 and Intel-based Macs are not supported.
Install VS Code
If you don’t have VS Code yet, follow the instructions in Download and install Visual Studio Code.
Install SysMLv2 Modeler
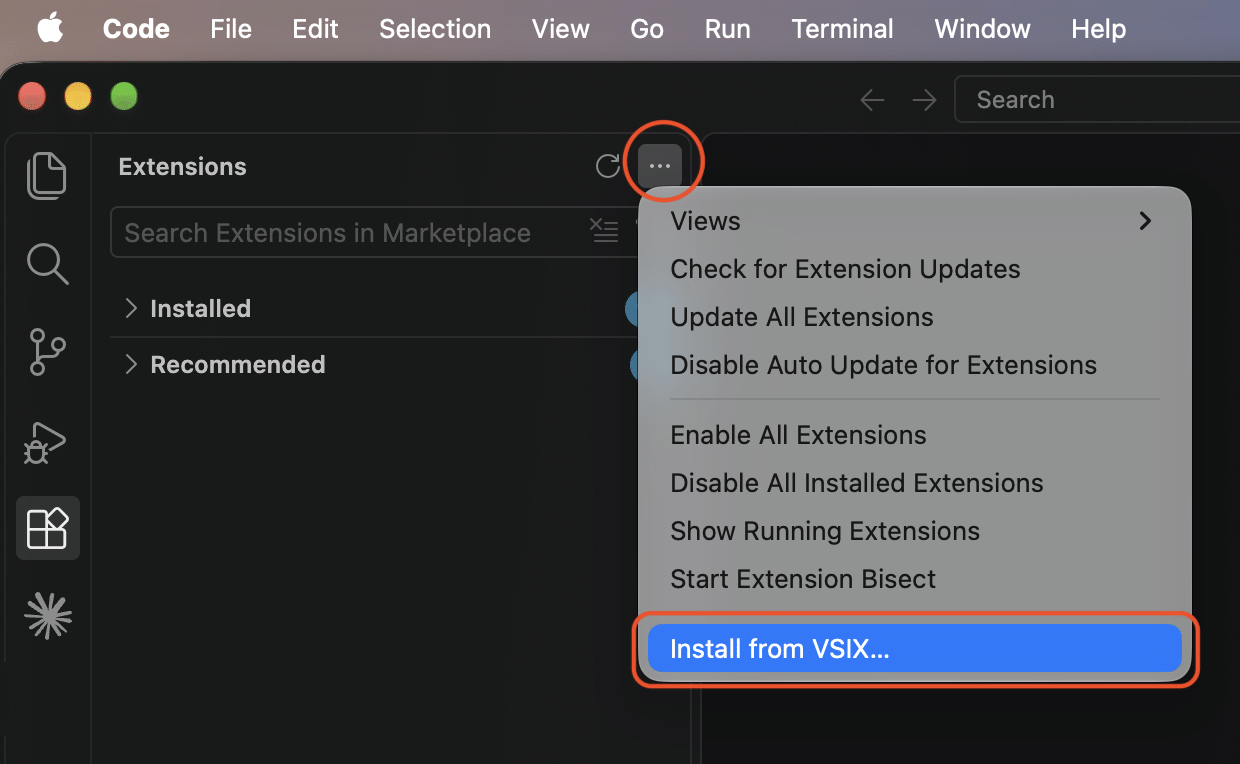
- Start VS Code and open the Extensions view from the Activity Bar on the left (the four-squares icon, ⌘/Ctrl+Shift+X).
- Click … at the top right of the Extensions view → Install from VSIX…, and select the
.vsixfile you received.
- The first time, you are asked to accept the license agreement. Review it, accept, and reload the window when prompted.
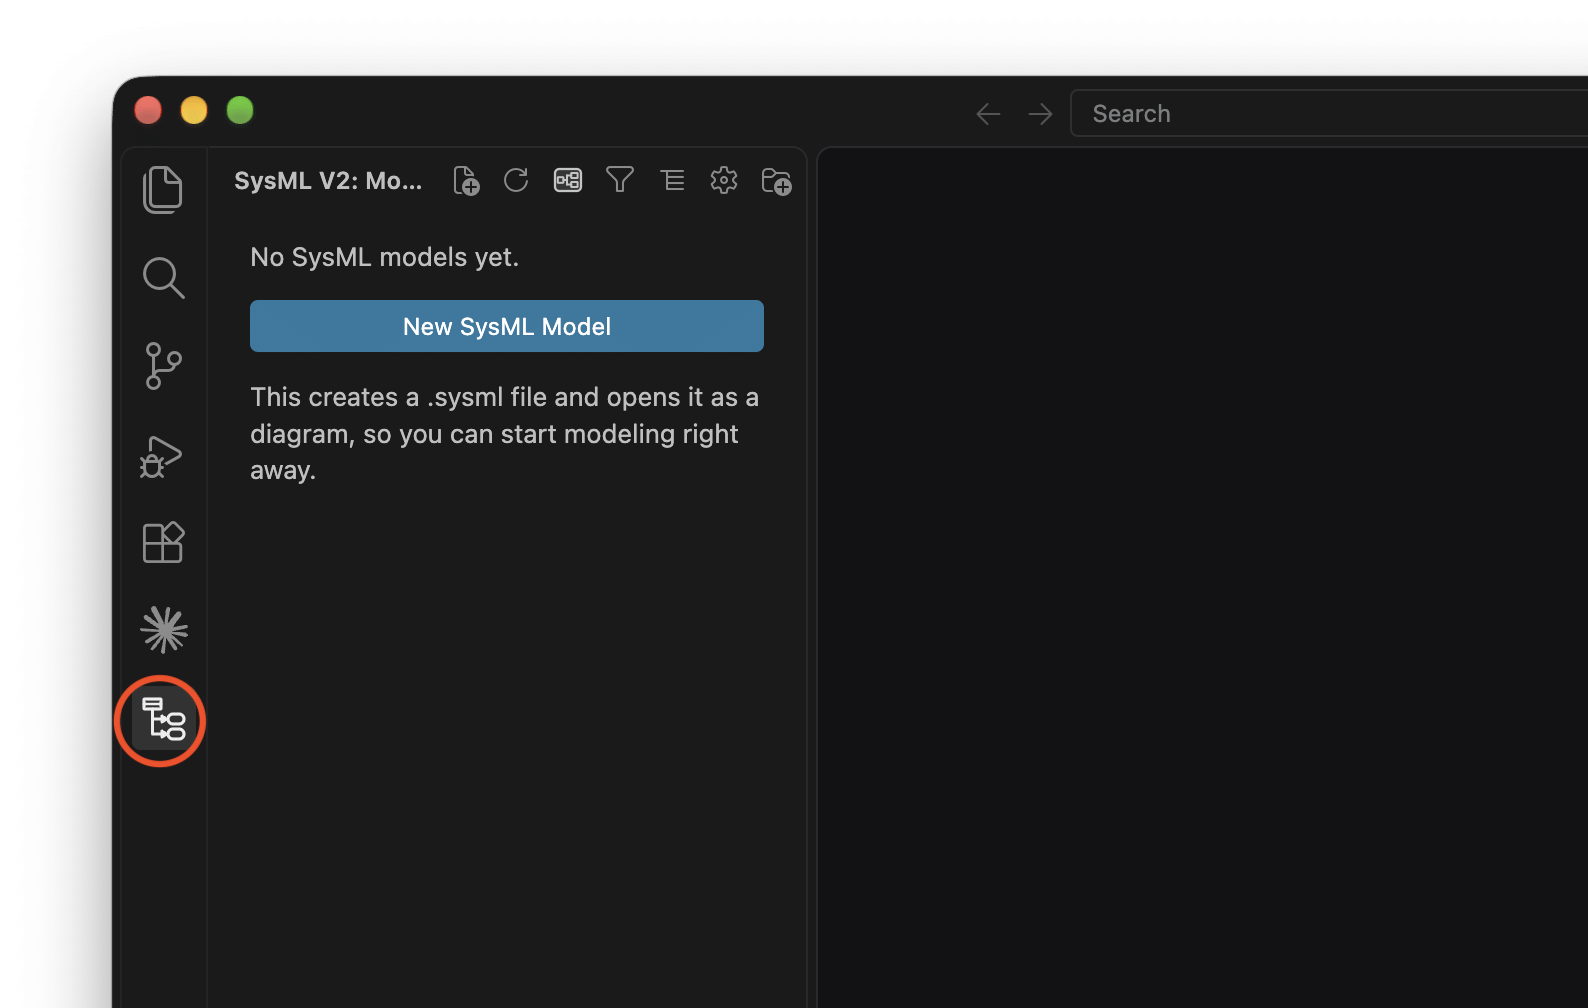
- When the SysML v2 icon appears in the Activity Bar, you’re done.
Disable other SysML v2 extensions. If another SysML v2 or KerML extension (for language support, syntax highlighting, and so on) is installed, it may take over .sysml files, and SysMLv2 Modeler may not work correctly. When SysMLv2 Modeler starts, it tells you the name of any other SysML extension that is enabled.
To fix this, type sysml in the Extensions view search box, disable (or uninstall) every SysML-related extension except SysMLv2 Modeler, and reload the window.
No further setup required. The extension comes bundled with a Java runtime and the SysML v2 standard library. There’s nothing else to install and no server to run.
Open the sample model
- Copy the entire
samplefolder included with this guide to a working folder. - In VS Code, choose File → Open Folder… and select the copied
samplefolder. - When VS Code asks “Do you trust the authors of the files in this folder?”, choose Yes, I trust the authors. The extension doesn’t run in Restricted Mode, which VS Code uses for folders you don’t trust.
- Click the SysML v2 icon in the Activity Bar. The sample appears in the Model Tree. The first time, this may take up to a minute while the standard library loads.

What’s in the sample A delivery robot simplified to four parts (sensor, controller, drive, and battery), three requirements (Payload, StopForPeople, and Endurance), three behaviors (Deliver, DrivingState, and StopSequence), and a 3D outline. The MiniRobotViews package contains nine diagrams (view declarations).
2. Exploring a model
You can explore the same model in three ways: as text, in the Model Tree, and on diagrams.
As text
Open MiniRobot.sysml from the Explorer or the Model Tree to see the model as SysML v2 text.

PersonSensor, press F12 to go to its definition.Use these commands to navigate the text.
| Task | How |
|---|---|
| Go to a definition | F12 or ⌘/Ctrl+click |
| Go back | Ctrl+- (macOS), Alt+← (Windows), Ctrl+Alt+- (Linux) |
| Find where an element is used | Right-click → Find All References |
| List all elements in a file | Outline view |
| Find an element by name and jump to it | ⌘/Ctrl+Shift+O (Go to Symbol in Editor). A list appears at the top of the window. Type to filter it. |
| See an element’s description | Hover over its name |
In the Model Tree
The Model Tree shows the model in the open folder, organized by ownership. Double-click an element to open it in the text editor, or right-click it and choose Open Diagram to see it on a diagram.

On diagrams
There are two ways to open a diagram.
A. From a view declaration (a saved diagram)
The MiniRobotViews package at the end of the sample contains view declarations such as view structure : InterconnectionView { expose …; }. A view declaration saves what the diagram shows, so it opens with the same contents every time. To save the layout as well, switch to manual layout (see Saving diagrams).
To open one, click Open Diagram above the declaration in the editor.

Or double-click the view in the Model Tree. You can also right-click the view and choose Open Diagram.

MiniRobotViews in the Model Tree.B. From a model element (a temporary diagram)
Place the cursor on an element in the text (for example, part def DeliveryRobot) and press ⌘/Ctrl+Shift+V. Or right-click the element in the Model Tree and choose Open Diagram.
A list appears at the top of the window, in two groups:
- Existing diagrams (upper group): saved diagrams that already show the element, such as the ones in A. Choose one to open it.
- Create a new diagram (lower group): diagram kinds, such as InterconnectionView and StateTransitionView. Only the kinds that suit the element are listed. Choose one, and a diagram centered on that element opens right away.

This new diagram isn’t saved yet. If you close it without saving, it’s discarded. To keep it, right-click its background and choose Save This Diagram to .sysml (Add View Declaration).
The diagram is saved as a view declaration. (This menu item doesn’t appear on diagrams that are already saved.)

From a diagram back to the text
Press F12 in a diagram to go back to the text. If an element is selected, you jump to its declaration. If nothing is selected, you jump to the diagram’s view declaration.
Views in the sample
The sample contains nine diagrams that cover all eight standard SysML v2 view kinds. GeneralView is used twice.

GeneralView Requirement text, constraints, and subject.

GeneralView Definitions and parts as a general graph.

InterconnectionView Parts, ports, and flows.

ActionFlowView The order of actions.

StateTransitionView States and transitions.

SequenceView Messages exchanged between parts.

GridView (beta)Which part satisfies which requirement.

BrowserView The ownership hierarchy as a tree.

GeometryView 3D shapes and their placement, using the Geometry library.
Zooming and panning
| Task | How |
|---|---|
| Zoom in or out | ⌘/Ctrl+wheel or trackpad pinch, ⌘/Ctrl+= / ⌘/Ctrl+-, or + / − on the panel at the bottom left |
| Reset to 100% | ⌘/Ctrl+0, or click the zoom percentage on the panel |
| Fit the diagram to the window | ⌘/Ctrl+9, or ⛶ on the panel |
| Pan | The wheel scrolls up and down, and Shift+wheel scrolls sideways. You can also drag with Space held down, or with the middle or right mouse button, or drag the frame in the minimap at the bottom right. |
| Select an area | Drag the background with the left mouse button |
3. Connecting your AI agent
Connect the AI agent you use through MCP (a standard way to give AI agents access to tools). You’re not tied to any particular AI service. The connected AI can see the open diagram (as an image and as structure), your current selection, and the model structure. It can explain them, and when you ask for a change, it edits the .sysml files directly.
How your design data is handled
- The model stays in your local
.sysmlfiles. It leaves your computer only through features you start yourself, such as AI integration and the@sysmlchat. - The MCP server accepts connections only from this computer (
127.0.0.1). - What you show the connected AI is handled according to that AI service’s terms. Connect only AI services approved by your organization.
① Turn on MCP
In Settings (⌘/Ctrl+,), search for sysmlv2-modeler.mcp.enabled and select the checkbox (off by default).

② Register it with your AI agent
How you register depends on your AI agent.
- GitHub Copilot (VS Code chat): no registration needed. Step ① is enough.
- Claude Code or Codex (in a terminal or as a VS Code extension):
- Open the Command Palette (⌘/Ctrl+Shift+P) and run SysML: Show MCP Connection Information.

- Click Copy Claude Code Command (or Copy Codex Command).

- Open a terminal in the sample folder, then paste and run the command.
On Windows with Claude Code, use the terminal inside VS Code (View → Terminal). A terminal outside VS Code may write the drive letter differently (C:\vs.c:\), and the Claude Code extension then doesn’t see the registration. If it still doesn’t appear, add-s userto the command.
- Other agents: follow your agent’s documentation and register the following as an MCP server.
| Item | Value |
|---|---|
| Type | MCP server (HTTP, Streamable HTTP) |
| URL | Run SysML: Show MCP Connection Information and click Copy URI (http://127.0.0.1:<port>/mcp/…) |
| Name | Any name (for example, sysmlv2) |
| Requirement | The AI agent must run on this computer |
Register once per workspace (folder). This doesn’t apply to GitHub Copilot.
- By default, the MCP port is different for each workspace (folder) you open. It stays the same for the same workspace, even after a restart. When you open a different workspace, register again there.
- Claude Code remembers registrations per folder (project), so run the command in a terminal opened in that workspace’s folder. Even when you switch between workspaces, each one connects to its own MCP server.
- Codex keeps only one registration overall, and registering again under the same name replaces the previous one. When you switch to a different workspace, register again.
- If you fix the port, you don’t need to register again when you reopen the same workspace. Set
sysmlv2-modeler.mcp.httpPortto a number (for example,23456) in your user settings. The end of the URL (/mcp/…) differs per workspace, so in a different workspace, register again with the command you copy there. Only one window at a time can use that port. Windows opened later use a different, temporary port. - If the same workspace is open in two windows, the second window uses a different, temporary port. If you can’t connect, first check the actual port in SysML: Show MCP Connection Information.
After registering, start a new AI conversation. Many AI agents load MCP registrations when a conversation starts, so a conversation that was already open can’t use the new connection. In Claude Code, type /mcp in a new conversation. When sysmlv2 shows as connected, you’re ready.
③ Talk to it
Try asking the AI the following. If the first one opens a diagram, you’re connected.
- “Open the structure diagram.” — the AI opens the diagram in VS Code.
- “Look at this diagram and explain what the controller does.” — the AI reads the open diagram and explains it.
- “What have I selected?” (select an element in a diagram first) — the AI reads your selection.
Environments that can’t connect The MCP server accepts connections only from this computer, so AI agents that run only on another computer or in the cloud (such as an AI you use only in a browser) can’t connect. If several people use this computer, click Turn On Authentication in SysML: Show MCP Connection Information to require approval for each connection. (The AI agent must support MCP authentication.)
4. Editing a model
You can create a new model, or edit an existing one in three ways: ask AI, edit the text, or edit the diagram. All three change the same .sysml text.
Create a new model (.sysml)
When there is no model (.sysml) yet
- Open an empty folder, then click the New Model or Diagram button (the file icon with ⊕, shown when you hover over the tree) at the top of the Model Tree.
- In “What do you want to start from?”, pick a starting point.
GeneralViewstarts blank; the other four (InterconnectionView, ActionFlowView, StateTransitionView, SequenceView) start with a template.

- Choose a file name. The
.sysmlfile is created and its diagram opens. From there, open the palette with the button at the top right of the diagram and place elements.

Adding a diagram to an existing .sysml
- In the Model Tree, select the package that should hold the diagram.
- Click New Model or Diagram at the top of the tree (or right-click the package → New SysML Diagram…) and choose the kind and a name.
- A container element (for a SequenceView, an
occurrence def) and a view declaration are added to the package, and a diagram with a template opens.
You can also ask AI. Ask something like “Create a structure diagram of a cleaning robot from scratch,” and the AI writes the .sysml and the view declaration for you.
Ask AI
The easiest way to edit is to describe the change to the AI (set up in Connecting your AI agent). The AI edits the .sysml file, and open diagrams update immediately.
- “Add the 0.5-second stopping time in StopForPeople (R2) as a constraint.”
- “Add motor and brake parts to the drive, and show them in the structure diagram.”
- “Add a
chargingstate to DrivingState with transitions to and from idle.”
Check the result. After the AI makes a change, ask “Check for problems.” The AI reads the editor’s diagnostics (the same errors shown as red squiggles) and reports them.
Work back and forth with the AI. This is how the tool is meant to be used. For example, ask the AI to “add a motor and a brake to the drive,” tidy up the layout and names on the open diagram yourself, and then ask the AI, “Look at the structure diagram. Are any connections missing?” Whoever makes the changes, and in whatever order, the same .sysml keeps growing.
Edit the text
These features help you as you edit models in text:
- Completion: suggestions appear as you type (press Ctrl+Space if they don’t). For example, type
battery.to see its ports. - Checks as you type: errors show as red squiggles and are listed in the Problems panel (⌘/Ctrl+Shift+M).
- Rename: put the cursor on a name and press F2. The declaration and every reference to it change together.
- Formatting: right-click anywhere in the text editor and choose Format Document.
// Example: add a brake inside DeliveryRobot
part brake : DriveUnit;
Save (⌘/Ctrl+S) and the open diagrams reflect the change.
Edit the diagram

| Task | How |
|---|---|
| Add an element | Drag a palette item onto the diagram (or select it, then click the diagram). Dropping it inside a part creates it inside that part. |
| Draw a relationship | Choose a kind under Connect, then click the source and the target. Flows between ports work too. |
| Change a name or value | Select it and press F2 (or double-click the label). References in the text change too. |
| Add quickly | When you select an element, a small command bar (the quick palette) appears nearby, with shortcuts for relationships, navigation, and other commands. |
| Delete | Delete. It is removed from the text as well. |
| Move and align | Drag (alignment guides appear and snap). Select several and press Alt+Shift+arrow keys to align. |
Elements keep moving? In auto layout mode (the default), the diagram rearranges itself every time you add an element. Click Pause Auto Layout (⏸) on the panel at the bottom left to stop this, and click it again to resume.
Save from the text tab. Edits made on a diagram go first into the (unsaved) .sysml text. Press ⌘/Ctrl+S in the text tab to save them.
5. Good to know
.sysml files and the model
- The text is the source of truth: the model is the text of the
.sysmlfiles (the standard SysML v2 textual notation). Diagrams draw that text, and diagram layout is also stored inside the view declarations. - One folder, one model: all
.sysmlfiles in the opened folder are loaded together and can refer to each other..project.jsonmarks the folder as a project. - Standard library: packages such as
ISQ::*(quantities) andSI::*(units) come from the bundled standard library. - It’s plain text: diffs, reviews and history in git work just as they do for source code.
When in doubt, ask AI
If you’re unsure how to write something in SysML v2, asking AI is the shortcut: “What’s the difference between satisfy and verify?”, “Write a test case that verifies this requirement”, “Which parts are not on this diagram?”. The AI reads the model structure and the diagram on screen, and can confirm its edits against the editor’s diagnostics.
Auto and manual layout
Switch the layout mode on the panel at the bottom left of a diagram.
| Mode | Behavior | Good for |
|---|---|---|
| Auto (default) | Rearranges the whole diagram whenever elements are added or removed. Layout is not written back to the .sysml. | Building up a model; checking its structure |
| Manual | Existing elements never move automatically; only newly added elements are placed. Positions are saved in the view declaration, so the diagram opens the same way next time. | Finishing diagrams for documents |
In either mode, Auto Layout on the panel (⌘/Ctrl+Shift+L) rearranges once. Click the Auto layout and display settings button on the panel to choose the layout algorithm, direction, spacing, and edge routing (Orthogonal, Polyline, or Splines) for each diagram.

View declarations and expose
Diagrams are written as view declarations in the .sysml. The expose lines decide which elements appear.
view structure : StandardViewDefinitions::InterconnectionView {
    expose MiniRobot::DeliveryRobot;      // show this element (and its contents)
}
view requirements : StandardViewDefinitions::GeneralView {
    expose MiniRobot::Payload;            // you can list elements one by one
    expose MiniRobot::StopForPeople;
}
view everything : StandardViewDefinitions::GeneralView {
    expose MiniRobot::*;                  // everything directly in the package
}- The
: …Viewpart is the kind of diagram. There are eight kinds: GeneralView, InterconnectionView, ActionFlowView, StateTransitionView, SequenceView, GridView, BrowserView, and GeometryView. - The label at the top left of a diagram’s frame shows the view’s name and kind. The box at the top right lists its
exposes.

- To add a new diagram, see Create a new model (.sysml).
- Put view declarations in a package of their own (like
MiniRobotViewsin the sample) to keep the model tidy.
Saving diagrams
You can save a diagram at two levels:
| What is saved | How | Next time you open it |
|---|---|---|
| Declaration only (what the diagram shows) | On a diagram opened from a model element (see On diagrams), right-click the background → Save This Diagram to .sysml (Add View Declaration). A view with its exposes is written. | It opens with the same elements. The layout is computed by auto layout each time. |
| With layout (positions, sizes, edge shapes) | Switch the view’s diagram to manual layout, arrange it, then press ⌘/Ctrl+S in the text tab. Layout is written inside the view declaration. | It opens exactly as you arranged it. |
Positions moved in auto layout are not saved. In auto layout mode, moving elements changes only the screen, not the .sysml. When you reopen the diagram, the auto layout returns. To keep a layout, switch to manual layout first.
Switching from manual to auto layout deletes the saved layout. You’re asked to confirm first, and you can undo it with ⌘/Ctrl+Z.
Compartments
The sections separated by horizontal lines inside an element are compartments. They group an element’s contents by kind, such as attributes, parts, ports, doc, and require constraints (see Views in the sample).

- To choose which compartments an element shows, select it and use the compartment button in the quick palette, or right-click it and choose Compartments….
- To edit a compartment row directly, select it and press F2 (for example, the battery’s
capacity = 880 [W * h]in the structure diagram).
GridView (trace matrix) (beta)
A GridView shows model elements and relationships as a table. The sample’s view traceMatrix is a matrix of parts (rows) and requirements (columns) that shows which part satisfies which requirement.
- In Settings, search for
sysmlv2-modeler.enableBetaFeaturesand select the checkbox. - Open the traceMatrix view (under
MiniRobotViewsin the Model Tree). It opens as a matrix. - Double-click an empty cell to add a
satisfyrelationship. It’s added to the text as well. - To see the data as a list (a table with attributes as columns), switch views on the panel at the bottom left.
- Click the table to select it, press ⌘/Ctrl+C, and paste it into Excel or another spreadsheet.
Why it opens as a matrix A view opens as a matrix when its declaration includes render ChangeVisionGridRenderings::asMatrix;.
Copying and exporting diagrams
| Task | How |
|---|---|
| Copy the whole diagram as an image | With nothing selected, ⌘/Ctrl+C → paste into slides or documents |
| Copy part of it | Select elements, then ⌘/Ctrl+C (only the area around them) |
| Export an SVG file | Right-click the background → Export as SVG. Stays sharp at any size. |
| Black and white for documents | ◐ on the panel (diagram theme: dark → light → mono), or the sysmlv2-modeler.diagramTheme setting |
Learning more about SysML v2
This extension follows the official SysML v2 release 2026-09.1 (SysML 2.1 Beta 2).
| Resource | Where |
|---|---|
| Specification (OMG) | omg.org/spec/SysML |
| Specification PDFs (the version this extension follows) | The doc folder of the official release |
| Official sample models | sysml/src/examples (examples by topic) |
| Training examples | sysml/src/training (short examples, one notation at a time) |
Open an official sample folder with this extension to view it as diagrams or have your AI explain it.
Troubleshooting
| Symptom | What to check |
|---|---|
Opening a .sysml file shows no “Open Diagram”, the Model Tree is empty, or completion doesn’t work | Is another SysML v2 extension active? Search for sysml in the Extensions view, disable everything except SysMLv2 Modeler, and reload (see the note under Installation). You can also click the language mode in the status bar (bottom right) to see which extension’s language is in use. |
| No SysML v2 icon in the Activity Bar | Did you trust the folder? (If “Restricted Mode” appears at the top of the window, click it and choose Trust.) Did you accept the license agreement and reload the window? Did you open a folder (Open Folder…, not a single file)? |
| The AI can’t see the model | Did you register MCP for the workspace (folder) you have open? (Connecting your AI agent) |
If that doesn’t help, contact us using the links below.
Contact, feedback, requests and bug reports
Impressions, feature requests (“I wish it did…”), questions about how to use it, and bug reports all go to the same place. Good news and pain points are equally welcome.
| For | URL |
|---|---|
| Contact, feedback, requests and bug reports | https://astah.change-vision.com/sys-modeler-inquiry.var |
| Product information | https://astah.change-vision.com/sys-modeler.var |
From inside VS Code, you can also use SysML: Send Feedback / SysML: Report a Problem in the Command Palette (⌘/Ctrl+Shift+P).
When reporting a bug, besides what happened, what you expected and the steps, a small .sysml that reproduces it or an image of the diagram (copy with ⌘/Ctrl+C) makes the investigation much faster.
Diagram images were drawn from the sample model by the actual extension. You can read the license agreement at any time with SysML: Show License Agreement in the Command Palette.